How To: Use Your Camera In Manual Mode
January 12, 2021
Introduction
(Total reading time: 8 minutes )
In my last post, we talked about the benefits of using manual mode over auto modes.
Great.
But, how do you do that?
Exposure triangle, bokeh, F/stop, Aperture, shutter speed, motion blur, etc, it can be so overwhelming!!

There are so many articles out there that break all of this down and what each thing does, so I’m not reinventing the wheel here, but I AM going to break down using manual mode in a way that I understand it and that makes it simple for me.
Photography does involve a lot of technical terms understandings. However, learning the in’s and out’s and all of the technical terms has never helped me.
I need to learn things in layman’s language and in practical terms, so that is what I am going to present today.
Hopefully, it will be easy for you to understand, too!
A few simple things to learn first.
Digital cameras have a lens that allows light into your camera and records the image that it sees onto a sensor that then saves the image.
You can picture the lens as your eye, the camera as your eyelid, and the sensor as your brain.
The lens allows you to see the image that you want to take a picture of, and when you use the shutter button on your camera, that tells the “Eyelid” of you camera, the shutter, to close and record the image onto the “Brain”, the sensor of the camera.
A few simple terms to understand:
Exposure:
This simply means how much light is hitting the sensor inside your camera.
Too much light and the image will be too bright > Overexposed.

Too little light and the image will be too dark > Underexposed.

Stop/Stops:
A stop is a unit of measurement used to measure how blurry you want your background (Aperture), how bright you want your image to be (ISO,) And if you want motion blur, or to freeze action (Shutter speed.)
All of these things are measured in what you call “Stops.”
One full stop is doubling the amount of the last “Stop.” There are 1/3 stops in between each full stop.
You will see how this plays out later.
Light Meter:
This is what your camera uses to determine to amount of light that is hitting the scene you want to photograph, and therefore, what the cameras settings need to be in order to get the proper exposure.
It is this light meter that really controls the settings of your camera in all of the auto modes that we talked about in the last blog.
Depending on the amount of light that is in the scene, when you set your camera in an auto mode, such as Aperture Priority, it is the light meter that then says, ok- since she set the aperture at X, and there is XX amount of light in the scene, I need to set the ISO and Shutter speed at XXX.
It may sound confusing, but it’s not.
You can find the light meter on any DSLR camera, either on the top LCD screen, the rear LCD screen, or as you look through the viewfinder.
This is what it looks like
 Canon light meter showing an underexposed reading (Arrow pointing towards the minus)
On Canon, the exposure counts one way, and on Nikon it counts the other way.
 On Nikon, the Overexposed (+ symbol) is on the left whereas the Underexposed (- symbol) is on the right
When the indicator is towards the – mark, it means that the cameras settings are too dark to expose the image properly and need to be changed to get a brighter image.
If the indicator is more towards the + mark, it means that the camera settings are too bright to expose the image properly and they need to be changed to get a darker image.
Either way, when the curser is in the middle under the “0”, that’s when you know that the cameras settings are correct to achieve proper exposure for the image that you want to photograph.
How does it work?
When you point your camera at an image that looks well lit to you, but the light meter is reading several stops underexposed, that means that you need to change your cameras Aperture, ISO, or Shutter Speed to allow more light into the camera to result in a properly exposed image.
If you point your camera at that same image but the light meter is saying that it is OVEREXPOSED ( Or the indicator is too close to the + mark) that means that you need to change one of your cameras settings to block out some of the light that is hitting the sensor.
We’ll get into this more, but that is what the light sensor is and what it does.
It tells you how much light is hitting the image, and given your cameras current settings, it helps you to know if you need to lighten or darken them to get the proper exposure.
This is how you can get a properly exposed image without having to take a million practice shots first.
Ok, here we go!
Three Basic Settings
When you have heard about using your camera in manual mode, you will have heard the terms Aperture, ISO and Shutter Speed.
These are the three basic settings that make up every action of your camera. Once you know what they do, manual mode becomes so much easier!
What you need to know is that these three settings all affect 2 separate things in your images.
Aperture: (Also known as F/Stop): Affects how blurry the background of your image is (Depth of field/ bokeh).
Also affects how much light hits the sensor of your camera > your exposure.
ISO: Affects how sensitive your cameras sensor is to the light around it. Therefore, it affects how bright your image is.
A high ISO can also make an image appear grainy > This is called “Noise.”
Shutter Speed: Affects if there is motion blur in an image, or if action is frozen.
Also affects how much light hits the sensor of your camera > your exposure.
So, let’s talk about these three things a little more in depth.
APERTURE
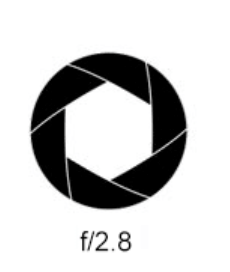
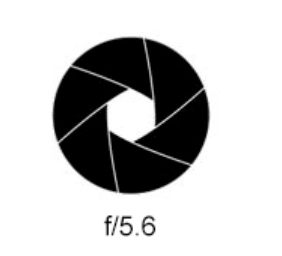
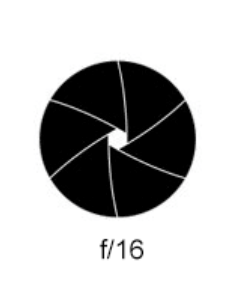
First, the lower the number for your aperture-F/Stop, the larger the opening in your camera is.
F2.8 | | | | | | | | | | | | | | | | | | | | F5.6 | | | | | | | | | | | | | | | | | |F16
The HIGHER the number, such as F/22, the SMALLER the opening in your camera is.
The simplest way to think of aperture is like our eyes.
You know when you get your eyes dilated at the optometrists and your pupils are huuuuuuge, so everything is super blurry?
When you leave the optometrists office, they give you those flimsy sunglass things, because the light hurts your eyes, right?
That’s because your pupils are so large, light is just flooding your brain, and you can’t focus on anything clearly because your pupils are so big.
Well, that’s the exact same thing as having a super wide aperture, like F1.2.
So, say you’re at The Grand Canyon on a super sunny day, and you look at your friends eyes as they’re squinting out to see the whole canyon- their pupils are super small, maybe even a pin prick of black in their eye?
That’s because they are trying to focus on EVERYTHING.
That’s what a NARROW aperture does. It makes everything in focus, compared to a WIDE aperture, like our dilated eyes, that makes the background (Everything except what we focus on) blurry.
F1.4 | | | | | | | | | | | | | | | | | | | | | | | | | | | | | | | | | | | | | | |F16
Wide Aperture/“Shallow” Depth of field > LOWER F/stop such as 1.2 = Blurry background.
Narrow Aperture/ “Deep” Depth of Field > HIGHER F/Stop such as F/16 = Everything in focus.
ISO
ISO is the setting that adjusts how sensitive your camera is to the light around it. This measurement works in stops, too. 100 is the lowest most cameras go, then the next full stop is 200, which is doubling the sensitivity to the light.
Each additional stop is doubling the amount of light that is hitting the sensor as the one before it.
ISO 800 increased to ISO 1600 is doubling the sensitivity to that of 800.
This image was taken with an 85mm lens at 1.2 and 1/4000 shutter speed. The ISO is at 100.

Leaving all other settings alone, let’s increase JUST the ISO by one stop, up to 200 You can see that you have doubled the amount of light in the image.
Now, let’s increase the ISO by one stop again. This is taken at ISO 400.  Each time you increase your ISO by one stop, it is doubling the amount of light of the stop before it.
Now, when you increase the ISO on your camera, it does make your camera more sensitive to light, and therefore, it can help to make your images brighter, however, the more you increase your ISO, or the higher number that you use, the more grain and noise is going to appear in your image.
While this occurs in all images, it is more noticeable in darker images and dark areas of images.
The following pictures were taken to show the effect that ISO can have on an image. The first picture was taken with an 85mm lens at F1.4 and a shutter speed of 1/100 of a second at ISO 500.
Low ISO > 100 or 200 > Less “Noise”
The next image was taken with drastically different settings, to illustrate what “Noise” or “Grain” is. This image was taken at F1.4, a shutter speed of 1/8000 of a second- which really blocked out the light. Then, I really cranked the ISO up to 20000 to get a similar exposure.
Higher ISO > 800 or 1600> Brighter image, more “Noise”
With this in mind, you always want to use the lowest ISO setting possible while still achieving the brightness that you want.
SHUTTER SPEED
This is probably the easiest one, so I saved the best for last. This measurement works in stops, the same way as Aperture and ISO.
There are full stops, with 1/3 stops in between.
So, what is shutter speed?
Remember, inside your camera is the sensor that records the image, just like our brain, right?
Well, in front of that sensor, there are two curtains, or shutters, that open and close when you release the shutter button.

Those two curtains acts just the same as our eyelids, and the shutter speed is telling the camera how long to “keep its eyes open,” so to speak.
When you set your camera at 1/800 shutter speed, that means that the shutters, the “eyelids” are only open and the camera sensor is only exposed for 1/800th of a second.
That’s faster than you can snap your fingers.
Practice
Sit up straight, focus on what’s in front of you and close your eyes.
Then, with your eyes closed, open and close them again as quick as you can. I mean, really open and slam them shut again, kind of a reverse blink.
Did you notice in that split second of time, that your brain recorded the image of the room around you, in that split second of time that your eyes were open?
That’s the exact same thing that shutter speed does.
Let’s say that’s the equivalent of 1/800 shutter speed.
Now, do the same exercise.
Sit up straight, focus on what’s in from of you and close your eyes. Then, open them, count “1 Locomotive” and close them again.
See how much more time your brain, AKA, the cameras sensor, has to gather light and record the image?
Putting it together
That’s what slowing your cameras shutter speed does. When you switch your shutter speed from 1/800th of a second to 1/400 of a second, you’re doubling the amount of time that the shutter is open.
Therefore, you’re doubling the amount of light that is hitting the sensor.
Just like when you held your eyes open for longer, the cameras sensor is now exposed to the light hitting it for a longer amount of time.
A FASTER shutter speed results in less light hitting the sensor, meaning a darker image.
However, since your camera shutter is only open for a fraction of time, it means that any action taking place in that scene is going to be frozen, just the fraction of a second that they shutter is open being recorded.
So, a SLOWER shutter speed results in the sensor being revealed for a longer period of time, meaning more light hits it = brighter image.
The tradeoff to this is, if you have action taking place in the scene you are trying to capture, your camera sensor will record the motion blur from the motion that happened while the cameras sensor was recording it.
In the images below, the wind was moving the branches, so you can see how a fast shutter speed freezes motion, while the slower shutter speed captured the blur that the blowing branches caused.
Faster shutter speed > 1/800 or 1/1000> Less light, frozen motion

Slower shutter speed 1/400 or 1/200> More light hitting the sensor, motion blur recorded

So, how do you know what to set your shutter speed at?
Keep reading to discover the fool proof formula for shooting in manual mode!
Formula
So, I mentioned that I would give you a formula to work with when learning how to shoot in manual.
I have to remind you that this is how I do things, this does not have to be how YOU do things. This is just what has worked the best for me, and I hope you find something here that can help you.
This may not be technically accurate, but you can let me know if this is helpful to you.
I simply use a 1,2,3 method.
- Set your Aperture first
- Set your ISO second
- Set your shutter speed last, and use it to fine tune your exposure.
I know that the most important thing for me in my image is A) exposure and B) blurry background.
If I know that I want a blurry, creamy background in most of my photos, I know that I will usually stay within the F1.4 to F3.0 range.
Therefore, I always set my aperture FIRST.
Then, once I have my aperture set at what I already know that I want it to be to get the background that I want, I set my ISO SECOND.
I want it to be as low as possible, while still giving a bright image.
So, if it is a sunny, bright day out, since my aperture is wide at 3.0, I will probably start out with my iso at 100 or 200.
Since there is a ton of natural, bright light, I know that I don’t need my camera to be extremely sensitive to light.
The LAST thing that you have to decide is your shutter speed!
If you are a portrait photographer, this is fairly easy since your subject may not have a lot of movement.
So, if your light meter is saying that it is over exposed, you can increase your shutter speed to reduce the amount of light that is hitting the sensor.
Say you are at 1/800 of a second, you can increase your shutter speed to 1/1600 (limiting the amount of light hitting the sensor.)
What does your light meter say now?
If it is still a bit overexposed, increase your shutter speed more, maybe up to 1/2000 of a second.
Once the indicator is under the middle hash mark of your light meter, you know that when you take the picture, you will have a “Proper” exposure.
You can use this same idea with your light meter to experiment with your ISO as well.
If your light meter is telling you that your image is underexposed, simply increase your ISO to get it to read properly, and vice versa if it is overexposed.
And that’s it!
Here’s what that would look like.
Setting my aperture at F1.4, because I want that creamy background, and my ISO at 100. My shutter speed is at 1/1000

It’s way too bright, because my wide aperture is letting a ton of light in. I don’t want to increase my aperture, because I want the background to be creamy, so I’m not going to change that. I can’t go any lower than 100 on my ISO, so I can increase my shutter speed to block out some of the light that is hitting the sensor.
Increasing the shutter speed to 1/2000

Increasing shutter speed to 1/3200 of a second.
So, you can see how you can use your shutter speed to fine tune your exposure when you already set your aperture first, your ISO second and your shutter speed last.
Conclusion
So, the formula for using your camera in manual mode is:
- Set your Aperture first
- Set your ISO second
- Set your shutter speed last, and use it to fine tune your exposure.
This is going to take some time and practice, but hopefully this takes some of the mystery out of using manual mode!
This may feel complicated and overwhelming right now, but it won’t for long!
Knowing that there are only three things, really, to adjust, makes it less fearful.
I would love to know how this works for you!
Leave a comment and let me know what you think and if you want to try this out!
There is an additional setting that you are in control of on your camera, and this is your white balance.
The next post will consider this – “Auto White Balance VS. Kelvin.”
Stay tuned!
Chian.
