HOW TO: Use Kelvin White Balance
January 21, 2021
Are you tired of blue skin tones and your images just lacking that certain something?
Read on to learn how using Kelvin for your white balance can up-level your images!
Good morning from the snowy state of Montana!

I am sitting here this morning wrapped up in a fuzzy blanket with snow falling outside and a heater warming up my little corner home office.
So this morning, I thought I would share a little something that has made my life sooo much easier as a photographer, and that is shooting in Kelvin for my white balance.
Do you shoot in Kelvin?
If you do, you know how amazing it is, right? To be able to completely change the appearance of your image and be in complete control of the color with just a click or two. It can really have a wonderful effect on getting your images correct in camera.
Do you shoot with an ExpoDisc?
For me, that is how I started out. I L-O-V-E-D my ExpoDisc.
I got it from B & H Photo, and it was the Holy Grail of my photography.
It’s something that I credit with really learning how to help me understand the exposure triangle. It really helped me understand how to set my camera accurately and understand what was happening in the beginning.
I don’t even really remember what made me start using Kelvin, I think maybe it was just curiosity. I just remember playing around with my camera one day, and wondering what Kelvin setting did.
First, I set my white balance to Kelvin, it was on 6500, I took a shot and it was wayyyyyyyy too warm (Yellow/Orange).
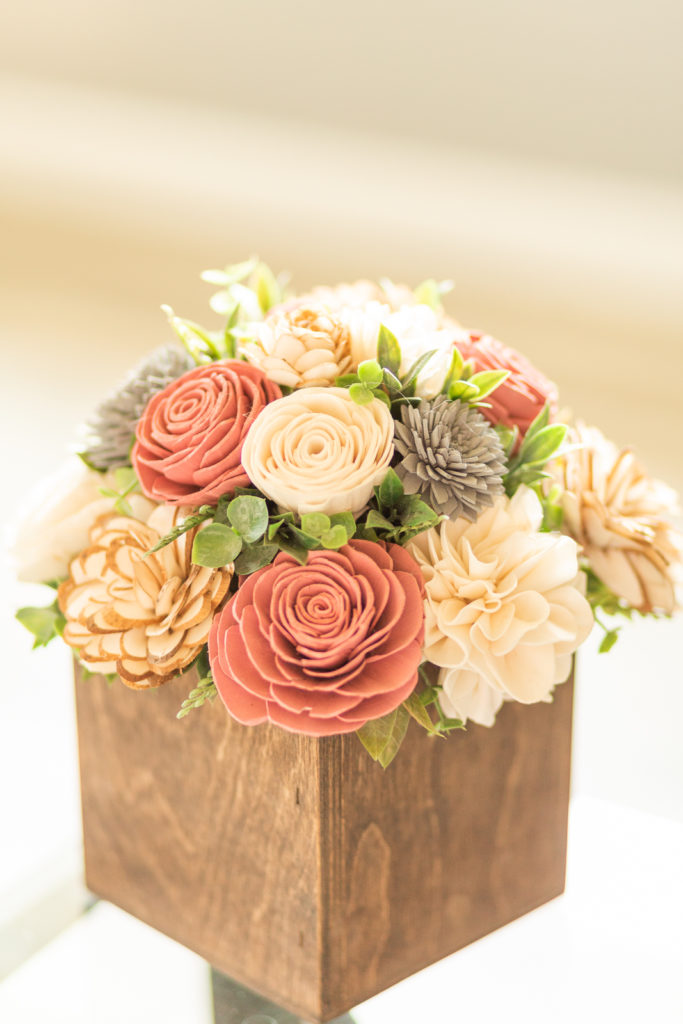
So, I turned my Kelvin setting up to 8000, not knowing what that would affect and took another picture. That one was hideously orange.
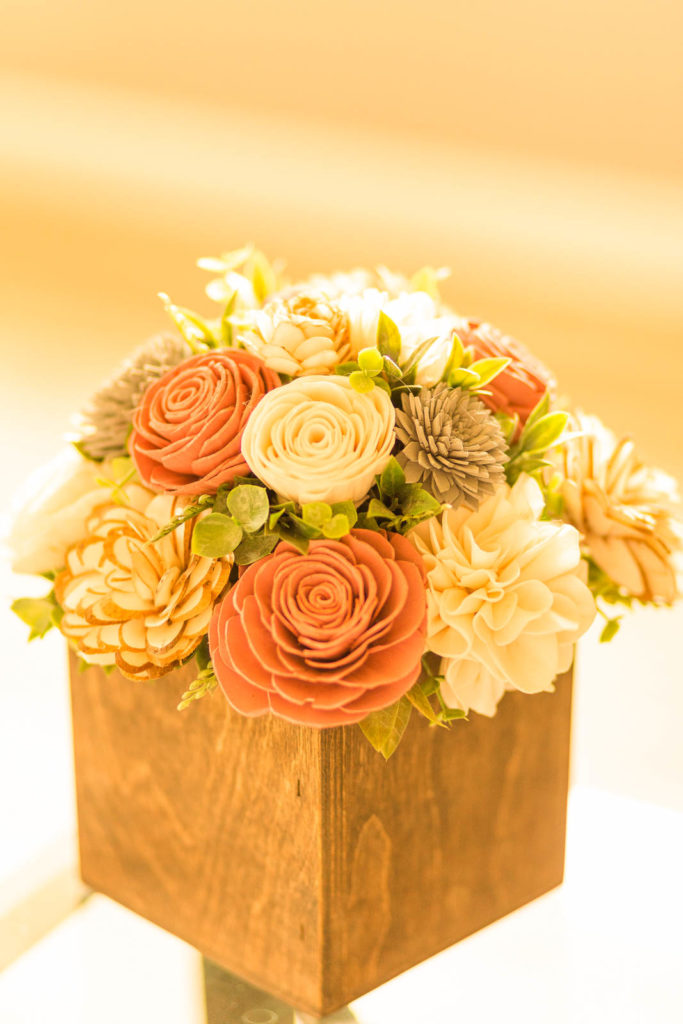
I mean, like “There’s no saving this image,” orange.
So, I turned my white balance down to like 4800 and guess what?
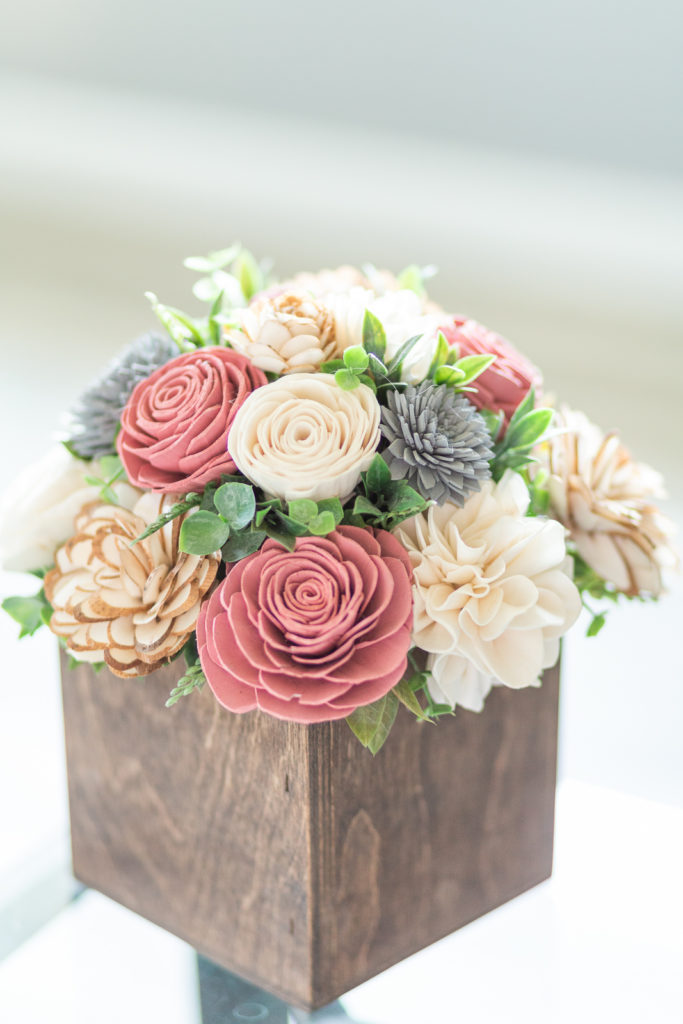
It looked amazing!
It had clear skin tones, correct color, and even the exposure looked better! (That was probably just my eye paying more attention to the image than the color)
That was the point that the ExpoDisc started staying in my bag.
Not all the time, because just like training wheels on a bike, I was afraid to go into a legit shoot without it.
I wasn’t confident in my skills to be able to set my camera set correctly without it.
Until I realized that there are actually far LESS steps to use Kelvin WB on a shoot than there is with the Expo.
What Do I Mean?
– Using the ExpoDisc, you set Aperture, Shutter Speed and ISO where you want it to get your light meter to center, right?
-Then you walk to where your client is standing, position yourself so that you are facing towards where you are going to be shooting.
-You educate your client on what you are doing so that it’s not awkward.
- Place the ExpoDisc over the lens of your camera and take a picture.
- Press review to pull up the image and press the menu button to set your custom WB.
- Choose that image to set the WB and then you can start shooting.
Because the ExpoDisc sets your exposure AND your white balance, there are a few difficulties with it.
Say the light you are shooting in changes. Or, a cloud covers the sun. Maybe you change position, then what?
You have to go through the whole process again to re-expo to get the correct exposure.
Now don’t get me wrong, I still love the ExpoDisc, it was my training wheels.
I just know from experience that it takes longer to use it, and that there is a simpler way.
So, what is different using Kelvin?
Using Kelvin, this is what you do:
– You set your Aperture, SS and ISO to where you want it to get your light meter to center
– Navigate to the kelvin screen, adjust your Kelvin rating to 6500 to start with,
– Take a test shot
-Adjust it up or down based on your test image.
-That’s it!
I know that sounds too good to be true, but it’s really not!
Seriously, it is so much faster!
You already know where you want your light meter to be based off of your style, right?
Either you want it at center for true exposure, 2/3 of a stop above for brighter exposure, or whatever style you want.
Whatever style that you like, you set the exposure where you want it.
Then, the only thing to set is your WB.
You do that all in the back screen of your camera.
There is no walking around, no explaining to your client what you’re doing.
Once you know how to use Kelvin to set your white balance, you have a complete knowledge of how your camera is working and how to set it.
How to Set your Kelvin:
-Power your camera on
-Set your aperture, SS and ISO where you want it for your conditions
-Navigate to WB adjustment
-Instead of “Auto”, “Custom” Or a Preset, set it to “K”
-Now, use your up and down or the scroll function on your camera to set it to 6500.
-This is a good middle ground between too warm and too cool.
-Take a test shot. If your image is too WARM, try setting your Kelvin to 500 COOLER, so take it down to 6000.
-If your image is too COOL, try setting it 500 WARMER, to -that would be up to 7000.
-Take another test shot to see the difference.
That’s all there is to it!
It feels a little scary at first, but try it out for a week or so and let me know if you love it or not!
Here is an example of the difference on my Canon between the 1000 settings.

I feel like I did not completely understand how to use my camera in manual mode until I started using Kelvin. Since I was using the ExpoDisc to set the white balance, I couldn’t truly use my camera without it. I had a fear of forgetting or misplacing my expo because I knew that I couldn’t really do a shoot without it, even if I had my camera.
I hope this helps or you find something beneficial out of it!
If you want to try out using the Kelvin setting for your white balance, you can grab my free “How to finally master WHITE BALANCE” download HERE!
What was the most helpful shooting tip that you have ever gotten?
I would love to hear it!
Drop a comment below to let me know!